
How to assemble a DIY door canopy?
 Oct 21, 2025|
 How to assemble a DIY door canopy?
A door canopy not only adds an aesthetic appeal to your home but also provides protection from the elements. As a door canopy supplier, I've seen firsthand how many homeowners are eager to take on the DIY approach when it comes to installing these useful structures. In this blog, I'll guide you through the step - by - step process of assembling a DIY door canopy.
Step 1: Gather Your Materials
Before you start the assembly process, it's crucial to have all the necessary materials at hand. You can find a comprehensive Door Canopy Kit that contains most of the items you'll need. The kit usually includes the canopy frame, roofing material, and fasteners.
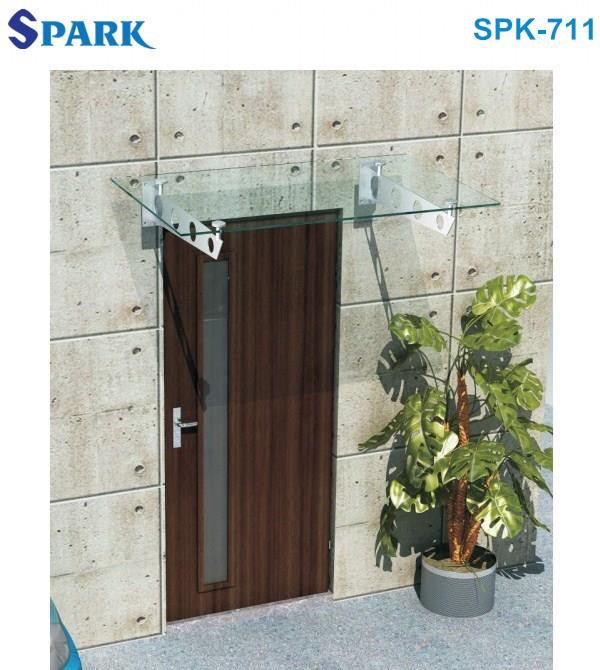
In addition to the kit, you'll need Door Canopy Aluminium Brackets for proper support. These brackets are strong and durable, ensuring that your canopy can withstand various weather conditions. You might also want to consider Door Canopy Metal for a more robust and long - lasting structure. Other tools required include a drill, a level, a measuring tape, and a screwdriver.
Step 2: Measure and Plan
Accurate measurement is the key to a successful DIY project. Use a measuring tape to measure the width of your door. This will determine the size of the canopy you need. It's advisable to make the canopy a few inches wider than the door to provide sufficient coverage.
Next, decide on the height at which you want to install the canopy. A standard height is around 7 - 8 feet from the ground, but you can adjust it according to your preference and the height of your door. Mark the installation points on the wall above the door using a pencil. Use a level to ensure that the marks are straight and even.
Step 3: Install the Brackets
Once you have your measurement and markings ready, it's time to install the aluminium brackets. Start by drilling pilot holes into the wall at the marked points. Make sure the holes are the right size for the screws that come with the brackets.
Place the brackets on the wall, aligning them with the pilot holes. Insert the screws through the brackets and into the wall, and tighten them using a screwdriver or a drill. Use the level again to ensure that the brackets are perfectly horizontal. If they are not, adjust the position of the brackets and re - tighten the screws.
Step 4: Assemble the Canopy Frame
Now, take out the components of the canopy frame from the kit. Follow the instructions provided in the kit to assemble the frame. Usually, the frame parts are designed to fit together easily, with pre - drilled holes for fasteners.
Start by connecting the horizontal and vertical pieces of the frame. Use the provided screws or bolts to secure the joints. Make sure that all the connections are tight and stable. As you assemble the frame, check for any signs of misalignment. If necessary, make adjustments to ensure that the frame is square and straight.
Step 5: Attach the Canopy Frame to the Brackets
Once the frame is fully assembled, it's time to attach it to the brackets on the wall. Lift the frame carefully and position it on top of the brackets. Align the holes in the frame with the holes in the brackets.
Insert the screws through the frame and into the brackets, and tighten them securely. Have someone assist you during this step to ensure that the frame is held in place properly and that it doesn't shift while you're attaching it.
Step 6: Install the Roofing Material
The roofing material is what gives your canopy its functionality and aesthetic appeal. Unroll or unfold the roofing material according to the instructions in the kit. Place the roofing material on top of the frame, starting from one end.
Secure the roofing material to the frame using the provided fasteners. These can be screws, clips, or adhesive, depending on the type of roofing material. Work your way across the frame, ensuring that the roofing material is smooth and free of wrinkles. Trim any excess roofing material using a utility knife.
Step 7: Final Checks and Adjustments
After the roofing material is installed, give the entire canopy a final inspection. Check all the connections, screws, and fasteners to make sure they are tight. Use the level one last time to ensure that the canopy is horizontal and properly aligned.
If you notice any loose parts or misalignments, make the necessary adjustments. Tighten any loose screws, and re - position any parts that are out of place. This final check will ensure that your canopy is safe and stable.

Step 8: Maintenance Tips
Once your DIY door canopy is fully assembled and installed, it's important to maintain it properly to ensure its longevity. Regularly inspect the canopy for any signs of damage, such as loose screws, cracks in the frame, or tears in the roofing material.
Clean the canopy periodically to remove dirt, debris, and leaves. You can use a mild detergent and a soft brush to clean the frame and the roofing material. For metal parts, you can apply a protective coating to prevent rusting.
Conclusion
Assembling a DIY door canopy is a rewarding project that can enhance the look and functionality of your home. By following these steps and using high - quality materials from our Door Canopy Kit, Door Canopy Aluminium Brackets, and Door Canopy Metal, you can create a beautiful and durable door canopy.
If you're interested in purchasing our door canopy products or have any questions about the assembly process, feel free to reach out to us. We're here to assist you with all your door canopy needs and can provide you with professional advice and support.
References
- General home improvement DIY guides from hardware stores
- Manufacturer's instructions for door canopy kits